Sunday, 11 June 2017

whatsapp hacking-hack whatsapp without victim number


WhatsApp Sniffer Tool

WhatsApp Sniffer Tool


As you all know that WhatsApp is the most famous instant messaging service around the world. Now WhatsApp is owned by Facebook. We are the most popular WhatsApp hacking service around the world. HackingChat offers all its service for free always. Now we are offering a 100% secure and genuine WhatsApp Sniffer Tool.
WhatsApp Sniffer download

What is Sniffing?

First of all, if you are a new comer, then you must know about this. If you don’t know about what is sniffing, then you no need to worry we are here to help you on this topic. Sniffing is an act with we can smell things around us. If we talk this in technical word then sniffing is an act with this we can get the data of our nearby device anonymously on our Device if we are connected to the same wireless networks like wi-fi and all.

What is WhatsApp Sniffer Tool?

Sniffer tool is a tool that works like our nose. Our nose can smell thing happening around us just like that Sniffer tool also can grab the data of our nearby device without letting them know.
WhatsApp Sniffer is a tool that captures all WhatsApp conversation, photos, videos and all other documents. This tool requires that we need to connect to the same wi-fi network. If you and your Victim attached to a different wi-fi network then, this Sniffing tool would not work for you as our nose don’t work for the Long distance.
This tool works to read all the WhatsApp conversation on same Wi-Fi network. WhatsApp Sniffer collaborates with all type of Wi-Fi Network like Open, WEP, WPA/WPA2.
This Tool collaborates with all phones including Android, iPhone, and Nokia if they are on same Wi-Fi. WhatsApp Sniffer will not work with Blackberry because they use their server, not WhatsApp’s server. This tool can only work with WhatsApp’s server. So the blackberry phone are not supported by this Sniffing tool.

Requirements to use WhatsApp Sniffer Tool

Operating System – iOs , Android , windows
Both devices should be on a same wifi network

How to use WhatsApp Sniffer Tool

Now this is the time to know how to use WhatsApp Sniffer Tool. As we already said that this WhatsApp Sniffing Tool is used to read conversation of other People who are on the same Wi-Fi network.

Step 1: WhatsApp Sniffer Tool website (for rooted phones)

First of all visit to the WhatsApp Sniffer Tool website and download the tool from there. This tool is entirely free available here. Our WhatsApp Sniffer tool is the best and secure tool that is available online at this time.


This application is very light and easy to use. This is a third party application by us, so you have to check your unknown resources in your Android Phone settings to do this simply follow the below step
Settings >> Security >> Unknown resources (allow)
WhatsApp Sniffer Tool

Step 2: Download WhatsApp Sniffer Tool

Now you need a rooted phone. If your phone is not rooted, then you can root your phone easily by searching it on Google by this term “how to root Android device.” Once your phone is rooted, then you have to download WhatsApp Sniffer Tool from the below link for free.
Once you have downloaded our WhatsApp Sniffer Tool on your phone.Install this tool on your Android rooted device. This Sniffer is too easy to use, we have used a very straightforward and easy user interface to make it understand easily by anyone.
If you don’t want to root your phone and want to hack into someone’s WhatsApp account, then you can use our online Whatsapp Hacking service or our WhatsApp Spy tool.

Step 3: Connect to same Wi-Fi Network

Only open this app and start using as we guided in this post below. Make sure that you and your victim are connected to same Wi-Fi network Otherwise; this will not work for you.
This WhatsApp Sniffer Tool uses TCPDump program which reads all the packets received and sent over the Wi-Fi network. This tool downloads all the packages shared on the Wi-Fi network and filtered all the packages that are related to WhatsApp of your victim. As we already stated that this app doesn’t work with Blackberry because they use their server instead of WhatsApp server.
You may also like:  Cheaper Whatsapp Spy Software

How to use WhatsApp Sniffer Tool  ( For NonRooted Device)

This is the central and important part of this post because many people don’t want to root their phone. Rooting your phone may void your warranty also. So we suggest you not to root your phone if your phone is in under warranty period otherwise you can do it without any Problem.


If you are working on a nonrooted device, then you don’t need to worry because you can also use this WhatsApp Sniffer Tool on the nonrooted devices also. We are using Whatsapp Xtract to use this tool on the nonrooted device.

Step 1: Download Whatsapp Xtract tool

WhatsApp Xtract is simply an awesome tool and easy to use. This tool is made and owned by XDA developer ZEDD. This is a very simple and blaze fast tool. If you have a nonRooted device, then you have to simply Play a trick to reading all the conversation of your victim. We use WhatsApp backup in this method, so lets get started –
To download, WhatsApp extract follows this link

Step 2: Get Whatsapp Folder

This is the essential step you have to do. You need access to your victim’s phone to use this WhatsApp Sniffer Tool. First of all get victim’s WhatsApp folder copied into your device to get started you can send it by using Bluetooth or by any sharing app. Here you can find your victim’s Whatsapp folder
File Manager >> Internal Storage >> Whatsapp (copy this folder)

Step 3: Copy at same Place:

Once you got all the files from the WhatsApp folder of your victim. Now copy all the files to the same place where you have extracted the Whatsapp Xtract on your desktop or laptop.
After this, you have to download WhatsApp backup extractor from this link

Step 4: Start extracting

Now run Install pyCrypto.bat file that is available in the extracted zip file. You have to run this file always as administrator. If you don’t run this file as an administrator, you will see an error or you file may be not opened. Because this requires some information to which the only administrator can give an authority so run this file as an Administrator.
Now Run whatsapp_xtract_android.bat or whatsapp_xtract_android_crypted.bat again from the extracted folder of whatsapp tool.

Step 5: Got your Sniffed files:

After this step completing successfully, you will get all the WhatsApp folder of your victim as a text file. You can read these files into your Laptop Browser.
Just this Sniffing tool removes the encrypt formatting from your victim’s WhatsApp files and provide you all the data in simple and easily readable format.

Step 6: Whatsapp Sniffer for iPhone

As you, all know that iPhone works with iOS. iOS is the most secure mobile platform because it doesn’t allow you to install a third party app on your Phone So you need to play a simple trick to use this Whatsapp sniffer on your iPhone.
If you are working with an iPhone, then you have to follow a little bit different step from above. As you, all know that iOS is a very secured operating system.
To use this tool with iPhone, you have to follow the steps given below –
You need to get a file named filenet.whatsapp.whatsapp/Documents/Chatstorage.sqlite and to get this file you need a software called iPhone Backup Extractor.
After downloading this tool, you have to make an un-encrypted backup with your iTunes software. Do not make an encrypted backup because if you do this Whatsapp sniffer is unable to extract your Data.
So, Guys, this is our WhatsApp Sniffer tool we hope that all liked this stuff. Please do not forget to share this with others.

Friday, 2 June 2017

shorte.st hot hacking 100% working

hack facebook account 2017 working trick:

whatsapp no:9043867649
facebook account--https://www.facebook.com/remo.siva.562
for proof:

for more proof visit that facebook profile and check all the details
Earn 100$ With Short.ST IN Just 20 Days ( 100% Auto Pilot )


HI TODAY I WILL EXPLAIN A WAY TO EARN 100$ EASILY FROM SHORTE.ST

STEP 1 : JOIN SHORT ST

 CLICK HERE IF YOU NOT REGISTER

STEP 2 : SHORT A LINK TO ANY ARTICLE IN ANY SITE 

STEP 3 : JOIN MaxHits


STEP 4: POST YOUR LINK THERE LIKE THIS 


(THIS WILL HIDE THE REFERRER) AND ALLOW 30 SEC

ENJOY YOUR EARNING

100% NO BANNING!!!!!

What is Shorte.st?

As the name suggests, it is a link shortener service based on Europe. You are already familiar with bit.ly, right? This one is far way better than that. Actually this service is linked with an advertise network which helps us to earn the money.
It’s the best and quick way to earn money so far. Read on to know more.

How to Start?

Shortest Review
  1. Just visit the site by typing shorte.st and enter
  2. Click on the link join on the home page
  3. You are a single step away from the success. Just enter email id two times and the password then click register.
Hurray, you are done! Have a look in your inbox for the activation mail and activate. That’s all. Enjoy monetizing your links and be prepare to give me a party ðŸ˜‰

Features

Shorte.st benefits
  • High commission compared to other networks
  • Don’t have to wait for the approval
  • User-friendly interface and interesting tools to bag the highest
  • Referral System with high payout
  • Real-time statistics to be aware about your earnings

How to Earn Money?

shorte.st make money from links
Though there are not a single way to earn money with shortes.st, the primary way is to shorten the links. We will credit with money to our account when someone clicks on our link and see the ad.

Several ways to earn from short links

  • You can earn by sharing your link on FB groups, Google plus, twitter and wherever people gathers. Try to choose an interesting source. So that you will get a higher Click Through Rate.
  • Just shorten the link of all your blog posts, when someone asks for your blog or a post links, give them the shortened link.
  • Do you have a WordPress blog? Then there is also a plugin available. Install and automate all the shortening (not much recommended)
Money Button

What are the Other Ways?

shorte.st referral program
You can also earn money through their referral system. It gives 20% commission for every referrals we bring in and it surely boosts our income. There are several tools also.
Quoting from their own site,
Tools
  1. Developers API
Simple JSON API for more advanced users. With API you can shorten links without placing any scripts on your website.
  1. Full Page Script
This script will monetize your external links, thus making them profitable. Easy to use- copy and paste.
  1. Social Share Widget
Have viral content that is shared all over the web? This tool will monetize every share your users make.
  1. Bounce Rate Monetization
Have high bounce rate? Make use of this. This script will turn your bounce rate into profit.
  1. WordPress Plugin
Do you have a WordPress Blog? Then be ready to automate the link-shortening using this plugin.
  1. Mass Shrinker
Want to shorten more than one link at a time? This tool is for that purpose. Mass shrinker will let you shrink up to 20 links at a time.
There is another effective way to make money through shorte.st. They will provide you a unique referral id (only for you), you can use it with the awesome group of banners they are giving. Several sizes and several colours and apt for any areas on your blog. You can manually copy the URL of image and insert your unique id as a link. Are you too lazy to do that, then shorte.st will provide you a ready-made code with image as well as your referral id as a link.

Rates and Payout Methods

There is no fixed rates available. Rate varies with the need of advertiser. But you can expect from $0.15- $7.78. Make sure to bring more traffic from U.S. and European countries. Because they have more conversion rates as well as the best payout.
This network possesses a threshold to withdraw money. That is not much high unlike the competitors, but only $5. So cheer up.
Currently shorte.st supports WebMoneyPaypal as well as Payoneer. So have an account of either of these before starting with shorte.st.
Check step by step guide  of setting up shorte.st account in this video turorial below:

Final Verdict

I hope you liked this Shorte.st review, this is one of the best money-making idea for anyone, for bloggers as well as for anyone who don’t even know what a blog is. Register with them, shrink URLs and share it. See the hike in your monthly earnings.

Wednesday, 19 April 2017

how to root any android phone using KINGROOT app


KingRoot 5.0.6 (174) Latest APK Download


Download KingRoot Latest Version 5.0.6 for Android

KingRoot APK
In Tools by Developer KingRoot Studio
(4.0/5 average rating on Google Play by 100,000+ users) Last Updated: April 10, 2017
You are downloading KingRoot Latest APK v5.0.6 (174). King-Root is an app that will assist you in rooting your Android device. KingRoot is a root tool for “lazy people” who just want to get root access but don’t want to flash any third party Recovery into their lovely device.

King Root file Information

File name: com.kingroot.kinguser_v5.0.6-174_Android-2.3.apk
Version: 5.0.6 (174)
Uploaded: April 11, 2017 at 12:03PM GMT+00
File size: 17.23MB (18,071,653 bytes)
Minimum Android version: Android 2.3+ (Gingerbread, API 9)
MD5: ae4020b2d4ac45810149dcc8f57c9baa
SHA1: 5c0cc28b5a494c57659ebe4db1a793cffa00aaf9

Download KingRoot APK v5.0:

KingRoot APK v5.0.6 (174)Download APK  File Size: 17.23MB (All Versions)
View Similar


SEE THE SIMPLE VIDEO HOW TO ROOT ANY ANDROID PHONE....ROOT ANY ANDROID IN 5 MINUTES WITHOUT PC

Older Versions of KingRoot


contact me for more info:

teaching

*hacking fb accounts using phising,faceniffer

*hacking WhatsApp using WhatsApp sniffer

*hacking using lucky patcher

*hacking using cheatdroid

*hacking using wifi kill pro


(just message me I show u with proofs)


WhatsApp no:+1(912)215-7577

    Rooting is the process of allowing users of smartphonestablets and other devices running the Android mobile operating system to attain privileged control (known as root access) over various Android subsystems. As Android uses the Linux kernel, rooting an Android device gives similar access to administrative (superuser) permissions as on Linux or any other Unix-like operating system such as FreeBSD or OS X.
    Rooting is often performed with the goal of overcoming limitations that carriers and hardware manufacturers put on some devices. Thus, rooting gives the ability (or permission) to alter or replace system applications and settings, run specialized applications ("apps") that require administrator-level permissions, or perform other operations that are otherwise inaccessible to a normal Android user. On Android, rooting can also facilitate the complete removal and replacement of the device's operating system, usually with a more recent release of its current operating system.
    Root access is sometimes compared to jailbreaking devices running the Apple iOS operating system. However, these are different concepts: Jailbreaking is the bypass of several types of Apple prohibitions for the end user, including modifying the operating system (enforced by a "locked bootloader"), installing non-officially approved applications via sideloading, and granting the user elevated administration-level privileges (rooting). Only a minority of Android devices lock their bootloaders, and many vendors such as HTCSonyAsus and Google explicitly provide the ability to unlock devices, and even replace the operating system entirely.[1][2][3] Similarly, the ability to sideload applications is typically permissible on Android devices without root permissions. Thus, it is primarily the third aspect of iOS jailbreaking (giving users administrative privileges) that most directly correlates to Android rooting.

    #1 Run Special Root Apps.

    With the help of rooting you can get access to run special apps those you cannot install in unrooted phones because these apps needs to get administrator level permission. Where as in rooted phones you can install these apps easily because it opens up the administrator privileges on your android device through which you have access to all core files of mobile phone. There are many special apps like backup apps, gesture apps and more other apps through which you can increase your mobile processing speed, customize phone features and can change its settings.

    #2 Run Custom ROM.

    Inbuilt ROM is called the stock ROM of the phone’s operating system that comes with phone when you buy it and a custom ROM is a altogether standalone version of the OS, that’s  including the apps, services, kernel  etc everything you need to operate the device and it is the most powerful  feature of rooted android phones. There are many custom ROM’s through which you can do everything like increasing the processing speed of your android phone as well as change its entire look. Because of the android open source developers gives the ability to change your phone according to you whatever you can do like you can change stock ROM, remove garbage files , apps, optimize it etc.

    #3 Free Internal Storage.

    There are many apps which come inbuilt in the android phones by default and we cannot remove those apps because there is no option to uninstall those apps but in the rooted phones you can easily able to remove those apps which are stored in the internal storage in your mobile phone and you can free your phones memory by deleting  or uninstalling them. In the case you do not want to delete inbuilt apps then you can easily move them into the SD card which makes some free internal memory in your phone.

    #4 Better Backups.

    As we know we can recover and accessed our data by booting into Android but rooting provides additional options for backup in case, your mobile phone fails to boot or experiences an other error while booting so due to this makes ClockworkMod Recovery an necessary tool for those who seeking to install custom Rom versions of Android. Once rooted by using the ClockworkMod Recovery option you can easily do a complete backup of your device and in case of major malfunction it provides you extra protecting.

    #5 OS Updates.

    Once you root android phone you can install different OS versions of Android. Sometimes manufacturers may delay the latest versions. So if you do not want to wait for getting available update on your phone. Rooting will opens the door and make helps in making device faster for Android updates. You can install new updates and version of android OS and can install in your phone before it available by rooting.

    How To Root Android Phone. ?

    How To Root Android Phone
    As above we explained you guys about rooting and different benefits of rooting. Now here we  are going to tell you about how to root android phone. Like we all know there many different mobile phones with different models. Unfortunately, every phone is different from other one, and due to these reasons to root android phone their are various methods. So we need to choose the best method to root android phone compatible with our own device model. It’s difficult for us to list a particular method according to device to root android phone. So here we listed some sites from where you can find everything about how to root android phone easily according to your device.

    Disadvantages Of Rooting Android Phone.

    Where there are benefits of rooting there are some disadvantages also. Like rooting is process to gain access on all the system of phone.  Its become risky for device to stable its quality. Rooting android directly effects on quality of the phone. Here we describe some points about effects which comes after when we root android phone.

    #1 Risk Of Bricking.

    However the rooting tutorials are good but it is a difficult task at some point. If you does any step or point in wrong then may be your android phone get bricked. It  is a situation when you miss out any step, does it wrong or pounce a corrupt zip file. Then your phone is nothing more than a brick. If your phone not capable of booting and doesn’t respond anything then it means it is bricked. But mostly there is only 2% chances from 100%. If you follow all the steps carefully then there are chances of bricking. So it all depends on the users.

    #2 Void Phone’s Warranty.

    Rooting voids you phone’s warranty. So whenever you want to root your phone do it after expire yours phone warranty because whenever you go for repair your phone in the warranty period after rooting then you will have to pay for it, they will not repair your phone free but you can overcome this problem by unrooting it. But if your phone bricked while rooting and you go for repair then you will have to pay for it, they will not repair it free.
    At the end we only want to say whenever you want to root android phone. Always follow right guide. Overall rooting android phone is best option to do. Always choose a right way to root android phone according to specific device model.

    Friday, 14 April 2017

    How to Downgrade from Android 7.0 Nougat to Marshmallow 6.0.1

    How to Downgrade from Android 7.0 Nougat to Marshmallow 6.0.1


    Android 7.0 Nougat has been out for the supported Nexus devices and will be coming soon to other Android devices from Samsung, LG, Motorola, Sony, HTC, Huawei and others. However, you might find some issues or changes in the nougat update that you may not like and would wish to downgrade back to Marshmallow 6.0.1 from Android 7.0 Nougat.
    Well, of course you can downgrade to Android 7.0 Nougat from Marshmallow. The process, however, will differ for devices from each manufacturer. All you’ll need to roll back from Nougat to Marshmallow is stock firmware build of Marshmallow for your device, which might be tricky to find for some, but we’ll do our best in this post to help you (at-least for the major Android manufacturers).
    As said above, installing stock Marshmallow firmware isn’t same for all devices. Every manufacturer has its own way of installing stock firmware on their devices, like Samsung uses its own proprietary software called Odin, LG has its own Flash Tool, Sony too has a FlashTool, Motorola has RSDLite, HTC has RUUs for each device and Nexus devices come with factory images flashable via Fastboot. And these are just the tools for the major Android manufacturers, but Android is a big world and there many more devices from various manufacturers with different solutions for installing stock firmwares (you may have to use Google for more info)

    How to Downgrade Honor5C from Android Nougat to Marshmallow? This Is What You Should Do!

    l

    Pre-Conditions:
    • Make sure that the Micro SD card is available with enough free space and can be read and write.
    • Make sure that the power of the battery is enough to run the Rollback process. It is recommended that the power of the battery is more than 30%.
    Note: Rollback operation will erase all user data. You should backup all important data on an external SD card before Rollback.
    Also, suggest you to log out from all the Gmail accounts on the phone.

    Force downgrade:
    Precondition:
    Format the Micro SD card (This operation is optional).
    Procedure for Force downgrade:
    Step 1: (Flashing Transfer_package):-
    • Create a dload folder to the root directory of microSD card.
    • Download the Software UPDATE.APP: http://bit.ly/2lBaS6h and copy it to the dload folder.
    • Make sure your handset is power off. Insert the Micro SD card into the handset. Press the VOLUME UP and VOLUME DOWN key, and then press the POWER key to power on the phone and enter the Software Upgrade Mode.
    • When the progress bar stops, the phone will restart automatically. Then, transfer package is updated successfully.

    Step 2: (Flashing Main_update):-
    • Now delete the old dload folder present in the sdcard.
    • Copy the entire dload folder: http://bit.ly/2mhITMT (with UPDATE.APP in it- Main_Update) to the root directory of the Micro SD card and insert it in your device
    • Make sure your handset is power off. Insert the Micro SD card into the handset. Press the VOLUME UP and VOLUME DOWN key, and then press the POWER key to power on the phone and enter the Software Upgrade Mode.
    • When the progress bar stops, the phone will restart automatically. The phone is now downgraded successfully to the M version.
    To check the version: Go to settings-> about phone-> Build number-> NEM-L22C675B151

    Exceptions:
    During the downgrade process if you face any issue, please contact:
    Customer Care: 1800-209-6555


    Flashing a system image
    1. Get the right system image for your device, then open up the archive to a safe location.
    2. Use a USB to connect your handset/tablet to your computer.
    3. Use one of these methods for starting the device in fastboot mode.
    • Adb tool: As the device is turned on, execute:
    adb reboot bootloader
    • Key combo: Shut down the device, then switch it on and instantly hold down the correct key combination for your gadget. To get a Nexus 6P ("angler") into fastboot mode, press and hold the volume down, then press and hold "Power" while the phone is in boot mode.
    4. Some users might have to get into the device's bootloader by running:
    fastboot flashing unlock
    However, dated devices might need the following command to unlock the bootloader:
    fastboot oem unlock
    Keep in mind that this action clears out all the data from the device.
    5. Once the bootloader is up and running, navigate to the location where you unloaded the system image.
    6. Execute the flash-all script, which will install the required bootloader, baseband firmware(s), as well as OS.
    When the script wraps up, your device should reboot. The next step is to lock the bootloader to ensure maximum security for your device
    To do that, start with the device in fastboot mode and execute:
    fastboot flashing lock
    Older devices might need you to run:


    Step 1. Backup or extract all Android data into PC firstly

    In order to avoid unexpected data loss problems while downgrading Android 7.0, it’s highly recommended for you all Android users to backup important data in Android devices firstly.
    If you have any backup software or Cloud account, you may choose to backup wanted data and files into Cloud or backup to PC. It’s not recommended for you to backup data in your phone since you are going to downgrade Android system, which may cause serious data loss issue. Here we’d like to recommend you try an Android backup alternative software - EaseUS MobiSaver for Android which supports all users to backup and extract all Android data into PC securely in 3 simple steps.
    You may now free download this software and activate it to follow below steps to backup and extract your Android phone data now:
    1. Connect your Android phone to computer
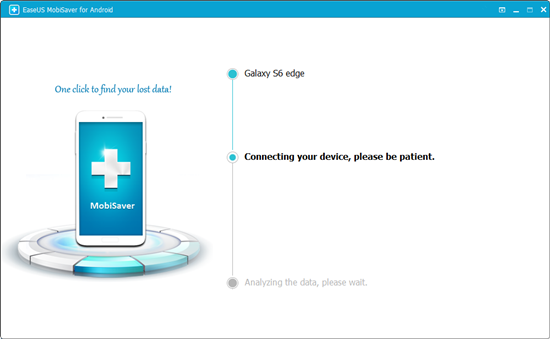
    Install and run EaseUS MobiSaver for Android and connect your Android phone to the computer with USB cable.
    Then click "Start" button to let the software read and connect your device.
    NOTE: As the software can only access the rooted Android device, you need to make sure that your phone has been rooted before recovery.
    Backup Android data before downgrade Android 7.0.
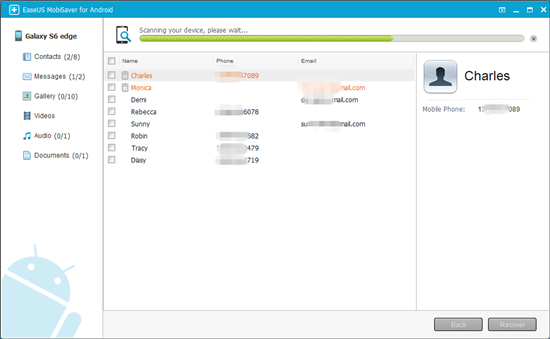
    2. Scan Android phone to find the lost data
    After connected your Android phone, the software will quickly scan the device to find all the existing and lost data including your lost data.
    Extract Android before reverting Android 7.0 to 6.0.
    3. Preview and recover data from Android phone
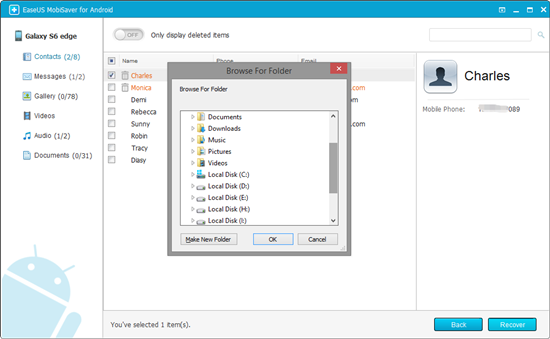
    Preview all the recoverable files one by one and then you can select out those you want to backup and extract quickly.
    Finally, you can click "Recover" button to extract those selected data and files to a safe spot in your PC now.
    Downgrade Android 7.0 Nougat to Android 6.0 Marshmallow without losing data.

    Step 2. Downgrade Android 7.0 Nougat to Android 6.0 Marshmallow

    Now you can follow the below detail guide lines to start downgrading Android 7.0 to 6.0 with ease now. 
    Note: Do remember to backup important data firstly for that Android OS downgrade may erase your fancy data in Android phone or tablets.
    1. Download and install Android SDK tools;
    • Download and install Android SDK Tools from Google’s developer site;
    • Install it to C:android-sdk > Launch the download from Start Menu once the Android SDK Tools are installed;
    • SDK Manager will open, uncheck everything except Android SDK Platform-tools and Google USB driver;
    • Click on Install 2 packages and check Accept license > Install.
    2. Download Android 6.0 Marshmallow factory image
    Android 6.0 Marshmallow factory image can be directly downloaded now in Google’s Android Developers site. Or you can directly click below link to get access to download wanted Android OS now:
    3. Uncompress/Decompress or UnZip downloaded Marshmallow factory image 
    All downloaded factory image files are all compressed and you shall firstly unzip or uncompress it firstly.
    Do remember to extract all content to the directory where you install SDK software, usually in C:program files (x86)androidandroid-sdkplatform-tools (if you installed the full SDK there).
    4. Enable USB debugging and connect Android phone with PC
    5. Flashing Android 6.0 Marshmallow factory image and uninstall Android 7.0 Nougat
    • Open Command Prompt and type: cdandroid-sdkplatform-tools and hit Enter;
    • Type: adb reboot bootloader and hit Enter;
    • Type: fastboot oem unlock to unlock Android device; (This step will erase everything on your Android phone. Therefore, please do remember to backup or extract your Android data firstly.)
    • Type: flash-all to install the bootloader, baseband firmware(s) and operating system - Marshmallow;
    Wait patiently and this process will last several minutes and don’t power off your device;
    Once it’s finished, your Android phone will reboot and you’ll successfully downgrade Android 7.0 Nougat to Android 6.0 Marshmallow.
    Note: If you happen to lose some data while downgrading Android 7.0 or uninstalling Android 7.0, don’t worry. You can still try EaseUS MobiSaver for Android and it will get all your lost data back.